PipeWire Audio Setup – Make Linux Sound Great!
UPDATE 01/01/2026: Easy Effects 8.0.8 renders this tutorial outdated, but you may still find much useful information, it is still encouraged to read this post to better understand Pipewire and Easy Effects.
Pipewire is a new audio processing engine in Linux designed to be a drop in replacement for PulseAudio. PipeWire is the future of Linux audio, it is low latency, handles Bluetooth audio much better than PulseAudio, has Flatpak and Wayland support, real-time multimedia processing and so on.
DeLinuxCo comes preinstalled with PipeWire but any distro can switch to PipeWire from PulseAudio. Manjaro as an example, if you are running PulsAudio and want to switch to PipeWire, Manjaro provides two meta packages that make it very easy to do so. To remove PulseAudio, remove the package manjaro-pulse then install manjaro-pipewire, it’s that simple. Look for the documentation on how your Distro handles the switch.
In this tutorial, we are going to show you how to take advantage of this new technology to make your speakers sound so much better, regardless of whether you are using a laptop or desktop. Now it may not be as good as the factory drivers from Dell or Lenovo, but it can make a huge difference.
What you will be able to do here is modify the sound of the speakers/headphones for more rich sound, assign presets to outputs devices. For example, you pair your Bluetooth headphones, and you create and audio preset specific to those headphones, when the headphones connect, the system will automatically switch to the newly connected device and activate the audio preset for that device. And you can create as many presets for devices as you would like. Let’s say that you have a PC and you have builtin speakers for your monitor, plus you have a set of book shelf speakers connected via bluetooth and last but not least you also have a nice pair of over the ear Bluetooth Headphones. You will be able to create a preset for each audio output and switch between any of them with a simple click, you can “pipe” that audio to which ever “wire” you want. 🙂
We will be using DeLinuxCo (Arch/Manjaro based) as the example, but this should apply to just about every other Linux distro out there, so let’s get started. Most of the tuning of the sound is derived from the help section in easyeffects package and I know it’s a boring man page to look at, but it offers a wealth of information on how to make your system sound much better than a base install, so read it when you can, open easyeffects and hit F1. You must remember that audio configuration for most Windows machines is done by the hardware manufacturers and you cannot expect a Linux Distro to be able to ship a Distribution with every sound hardware pre-configured for every machine out there.
Step 1: Assuming you already have a working sound system, make sure the following packages are installed at minimum;
- pipewire
- pipewire-alsa
- pipewire-pulse
- wireplumber
- gst-plugin-pipewire
- easyeffects
- calf
- lsp-plugins
- zam-plugins-lv2
- mda.lv2
- yelp
Step two: enable easyeffects to start with system
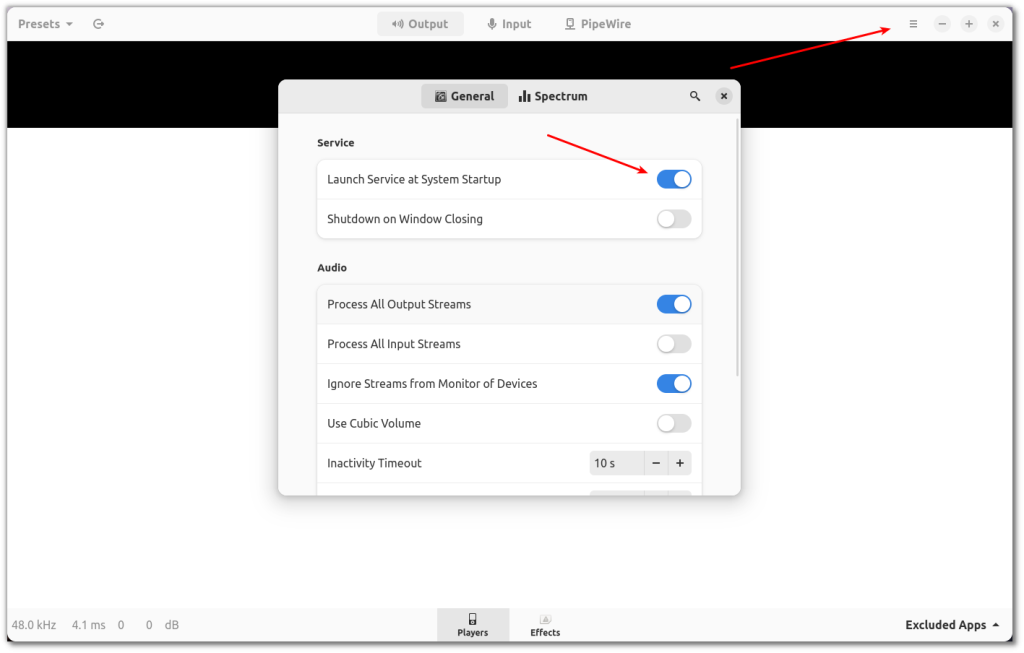
Open easyeffects from the main applications menu, in DeLinuxCo, click on the top/left Hamburger menu “DeLinuxCo” and it should be listed on the left Favorites Menu by default. Then on the right/top hamburger menu of easyeffects, select Preferences and enable “Launch Service at System Startup”.
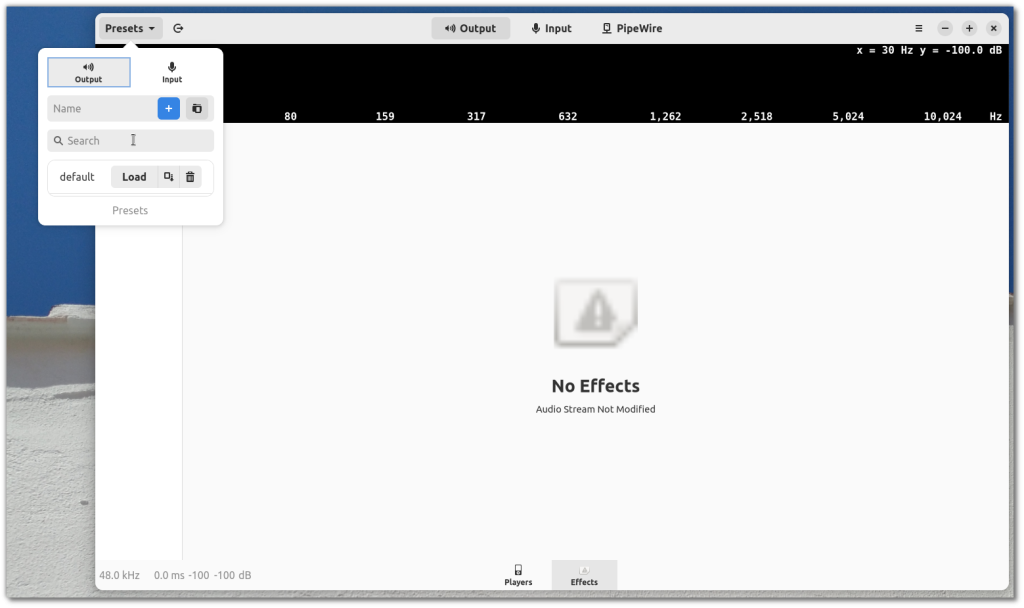
Step 3: In easyeffects, select the top Output tab then at the bottom select Effects and create a new preset. This one I named “default”, but you can name it what ever makes sense, this will also be the default for the system. For instance, my default audio is the builtin speakers in my Dell monitor, so I could name it Dell if I wished.
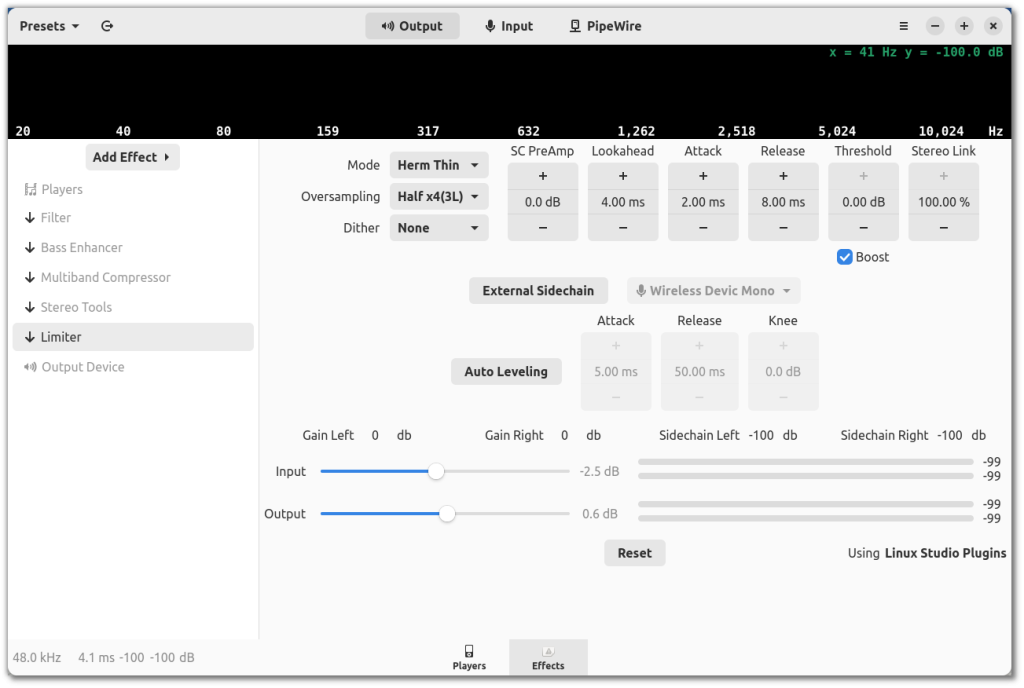
Step 4: Configure effects! Add these 5 effects in this order, and disable all but “Limiter”, by clicking the power button to the right of the effect. Note! You must save your settings periodically otherwise you will loose it. On your preset name, between “Load” and the little trash can, save it every time you make a change!
- Filter
- Bass Enhancer
- Multiband Compressor
- Stereo Tools
- Limiter
We will start with the last signal processor being used. As soon as the signal hits the sound card DAC it has to be below 0 dB, otherwise it will result in a distorted, messy sound.
Enable the Limiter, you will not hear any difference, which is what we expect. It will hit in as soon as we start messing up the signal with all the other processors. Set PreAmp to 0 dB, Lookahead to 4 ms, Attack to 2 ms and Release to 8 ms.
A Limiter monitors the signal in (nearly) realtime and detects peaks over a certain Threshold, in our case 0 dB. Set also Stereo Link to 100%, Oversampling to Half x4, disable External Sidechain and Auto Leveling and leave remaining options to their defaults.
As soon as a peak is detected, it starts lowering the volume constantly (within the Lookahead) until the peak will be below Threshold. Afterwards it raises the volume again (within release time frame) until it is back to normal. This way we avoid signals above Threshold hitting the DAC without being noticed too much. If one tries to overdo limiting, it will definitely result in distortion and other side effects, but in our case it’s just a fire-and-forget troubleshooter so we can concentrate on the results without trying to mess with levelling over and over again.
Don’t overdo things! This might render your overall sound experience worse than before.
Step 5: Enable and configure Filter.
Note: Shortly after making this tutorial, the Filter tab layout changed. Follow which ever is installed on your system.
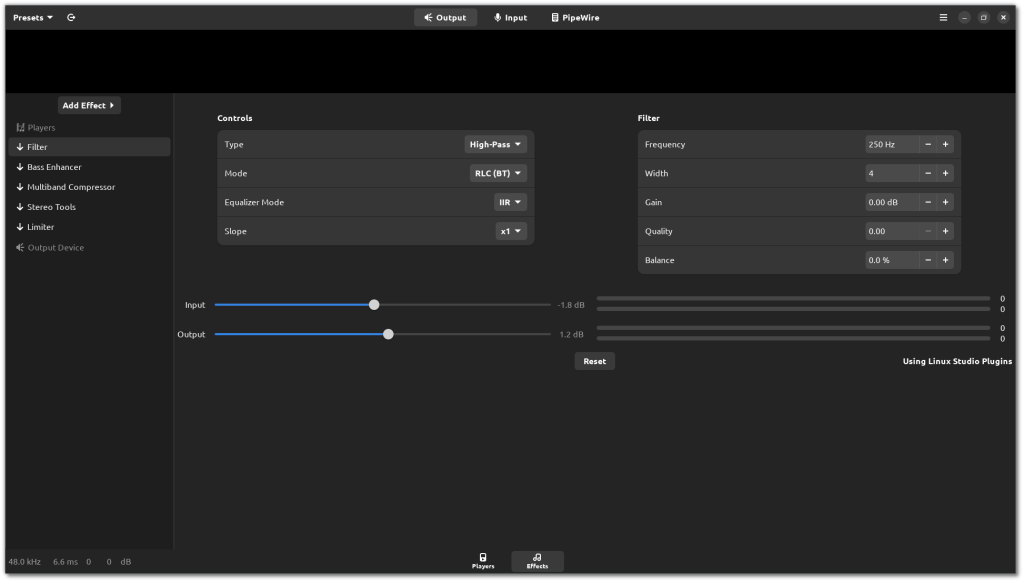
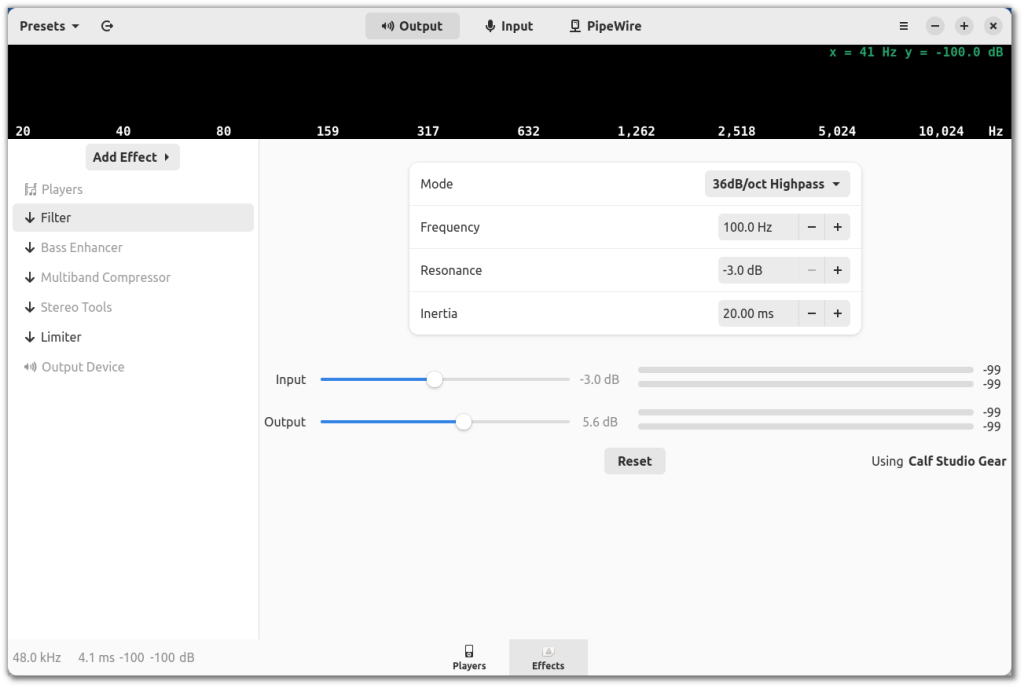
*Remember, set you Frequency to no lower than what your speakers can handle. If you can find the specs on your speakers, you will find the frequency response range, something like 175-20K or something like that. That means setting your frequency below 175 is pointless and can actually damage your speakers.
First of all we should remove frequencies that cannot be heard because even if the speakers are unable to reproduce them a lot of energy will be wasted in the process. This will lead to problems like not being able to use the full dynamic range and the introduction of digital and physical distortions.
Enable the Filter on the list and set the type to 36 dB High Pass (this will cut off everything below a frequency and will let everything above it pass) and the frequency to 50 Hz (which is definitely below your laptop’s speakers abilities). Continuously raise the frequency by 10 Hz until you start hearing a change in the lower end of the audible signal, which should be around 130-160 Hz. Subtract 10% (or 15 Hz) and set it as the Filters frequency. On my machine it is 145 Hz, since the signal started being affected at 160 Hz.
What happened is that we removed everything the speakers can’t reproduce at all, leaving a little bit of signal just below this frequency, which is quite important for the next step.
Step 6: Enable and Configure Bass Enhancer
Let’s grow some testicles to the signal.
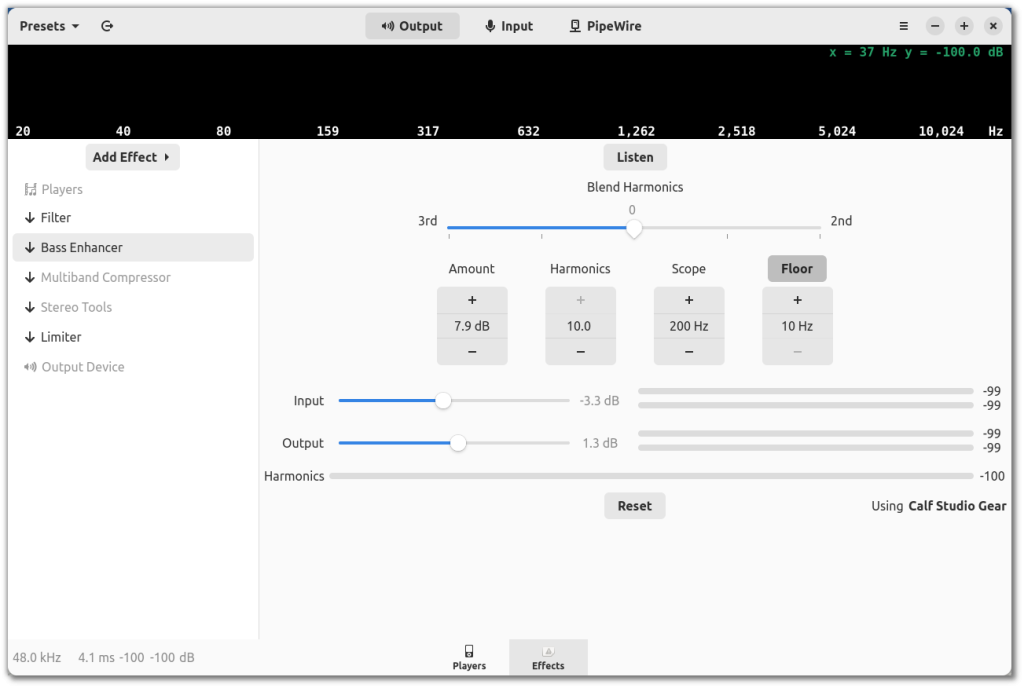
Enable the Bass Enhancer, set the Floor to 10 Hz and forget about it (we already removed everything below the Filter plugin cutoff frequency). Raise Harmonics to 10 and start with a Scope of 200 Hz. Now start raising the Amount continuously until the bass takes over the whole energy, which is definitely too much.
What happens is that the Bass Enhancer adds frequencies to the signal which weren’t there before. While an Equalizer only raises stuff which is already in the signal, a Bass Enhancer improves the lower end by adding distortion to a specific frequency range. This kind of distortion adds so called Harmonics to the signal which is a multiple of existing frequencies. On the Blend slider you can choose seamlessly between 2nd and 3rd Harmonics, which means that a frequency of 100 Hz produces a new signal of 200/300/400/600/800/900 Hz… at varying (due to the Harmonics setting) and constantly decreasing levels. This means we’re effectively raising the lower range into something better reproducible. It doesn’t add or raise the real fundament (so your trousers won’t start to flutter), but makes more audible signals that have been swallowed by the hardware before.
Later on, in order to refine the result, you should play with the Amount parameter to define the level of bass and maybe with the Scope to define the upper end of our additional Harmonics.
Step 7: Enable and configure Multiband Compressor
This is the most demanding step in the chain. Even professionals have great respect for this signal processor since it’s absolutely able to destroy your signals big time. But let’s be honest, we’re consumers and no one will hear the difference between 100 ms and 200 ms Attack time – even on notebook and tablet speakers. This means we can work with some reliable, well established defaults for the timing and frequency splits.
The Multiband Compressor will solve several things for us. It will cut outstanding and annoying frequencies, lower the overall dynamic range and figure our overall frequency response. The latter is what most people try to achieve with an Equalizer. Thing is Equalizers aren’t dynamic which will add to the problems instead of solving anything.
Enable the Multiband Compressor. Remember, you must click on the Band number on the right to change the settings for that Band.
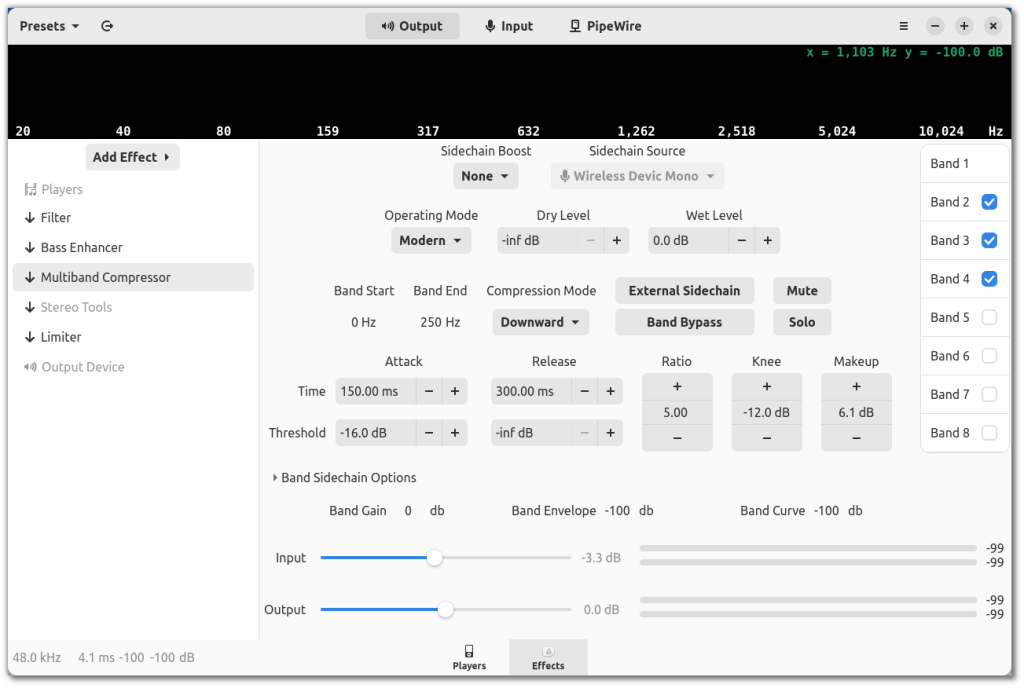
Since the Bass Enhancer really raised the energy and level of the signal, lower the Multiband Compressor input gain to -6 dB as a starting point. Enable bands 2, 3 and 4. Set Modern Operating Mode and disable the Sidechain Boost. Then let’s set the split frequencies for the different bands:
Band 2 Start: 250 Hz
Band 3 Start: 1250 Hz
Band 4 Start: 5000 Hz
Afterwards let’s set some defaults:
Band 1
Attack Time: 150 ms
Release Time: 300 ms
Attack Threshold: -16 dB
Ratio: 5
Knee: -12 dB
Makeup: 4 dB
Band 2
Attack Time: 150 ms
Release Time: 200 ms
Attack Threshold: -24 dB
Ratio: 3
Knee: -9 dB
Makeup: 4 dBBand 3
Attack Time: 100 ms
Release Time: 150 ms
Attack Threshold: -24 dB
Ratio: 3
Knee: -9 dB
Makeup: 4 dBBand 4
Attack Time: 80 ms
Release Time: 120 ms
Attack Threshold: -24 dB
Ratio: 4
Knee: -9 dB
Makeup: 4 dBCompression Mode for all enabled bands should be Downward. The remaining parameters can be left to their defaults. These values should be a good starting point.
A Compressor lowers signal levels which appear above a certain Threshold. It adds a simple multiplication to the signal defined by the Ratio. If the Threshold is set to -24 dB and Ratio to 2, a signal of -12 dB would in fact become -18 dB. In this example one can then raise the Makeup parameter to 6 dB, since this is what went “lost”. So first of all we’re rendering loud signals quieter to then raise the overall volume, which leads to less dynamic range with quiet parts becoming more audible.
The timing settings affect the “speed” of the compression. Attack means that a signal needs to go over Threshold for this amount of time until the Compressor reaches the full (negative) amplification. Release defines the amount of time the signal has to stay below Threshold until the amplification is back to 1 again.
A Multiband Compressor splits the signal in various frequency ranges to work on them exclusively with dedicated compression stages. This means that a very loud bass drum would not affect a crash cymbal, since they are clearly located in different bands.
Start playing around with these parameters:
Makeup – This is probably most important setting in this concept. Makeup raises the signal after compression stage which means that it directly influences the perceived volume of every single band. Or in other words: this is your Equalizer :). Raise Makeup of single bands to make them louder or quieter.Input Level – Set it to -6 dB by default, I ended up at -3 dB. What happens is that a higher input level pushes all bands of the Compressor equally, leading to a allegedly louder sound (well, the loudness was raised in fact) without tweaking every single band manually. This reduces the overall dynamic range, raising quiet parts and squeezing loud parts even more.
Step 8: Enable and Configure Stereo Tools
After figuring our overall sound let’s look for some icing on the cake.
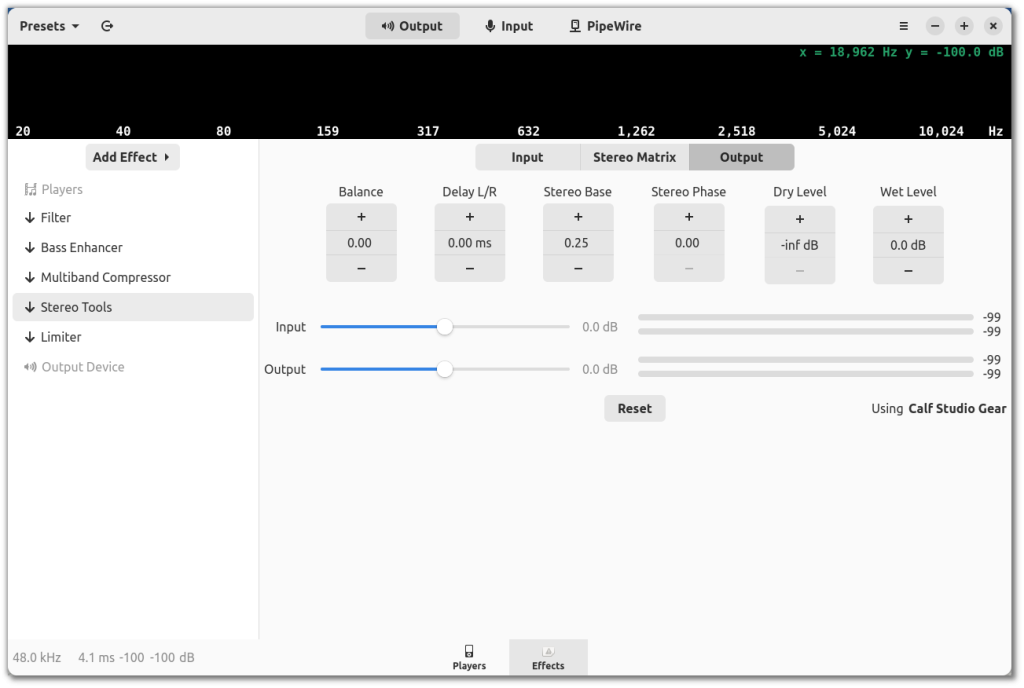
Add the Stereo Tools and place it at the fourth position, after Multiband Compressor and before Limiter. This tool has a lot of functionality but we only need just a single parameter. Switch to the “Output” tab and set the parameter Stereo Base to 0.25. That’s it.
Stereo Base acts on the two channels. It adds inverted signals crossover-wise. This way one can bring a full stereo signal down to mono seamlessly (by going negative values, -1 is fully mono) but also raise the stereo base by choosing positive numbers. This setting has lots of side effects, so avoid overdoing it! One of the bigger problems is that it reduces the bass range due to different effects, which is something we definitely don’t want here.
Play with Stereo Base to spread the appearance of your sound to a nice, broad stage without losing the center (vocals, snare drums, conversations in movies) or substance in the lower end. Most likely values between 0 and 0.5 will give some good results.
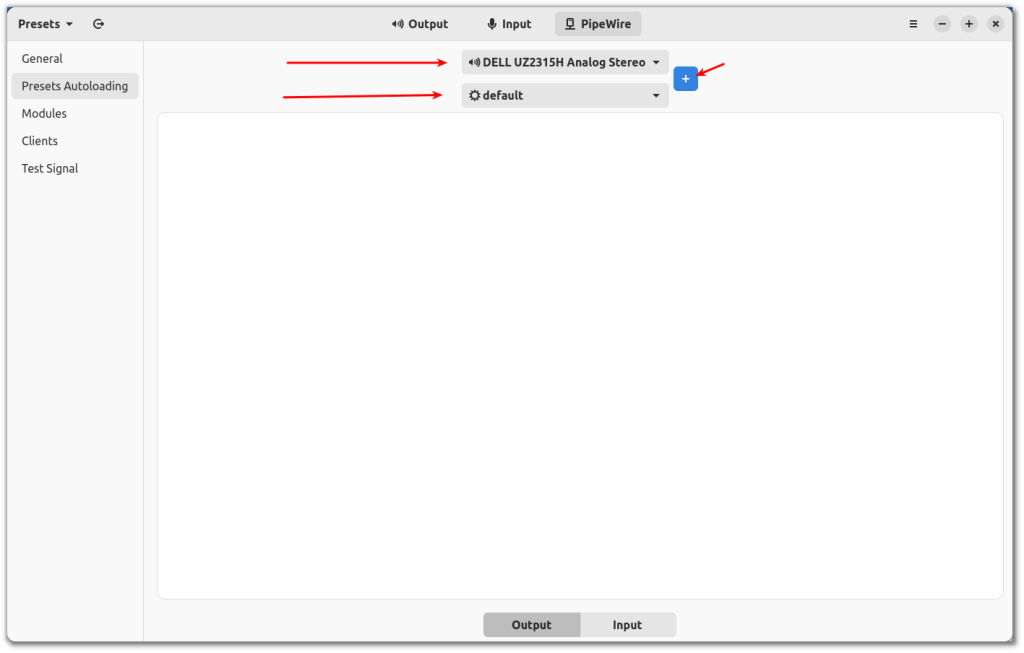
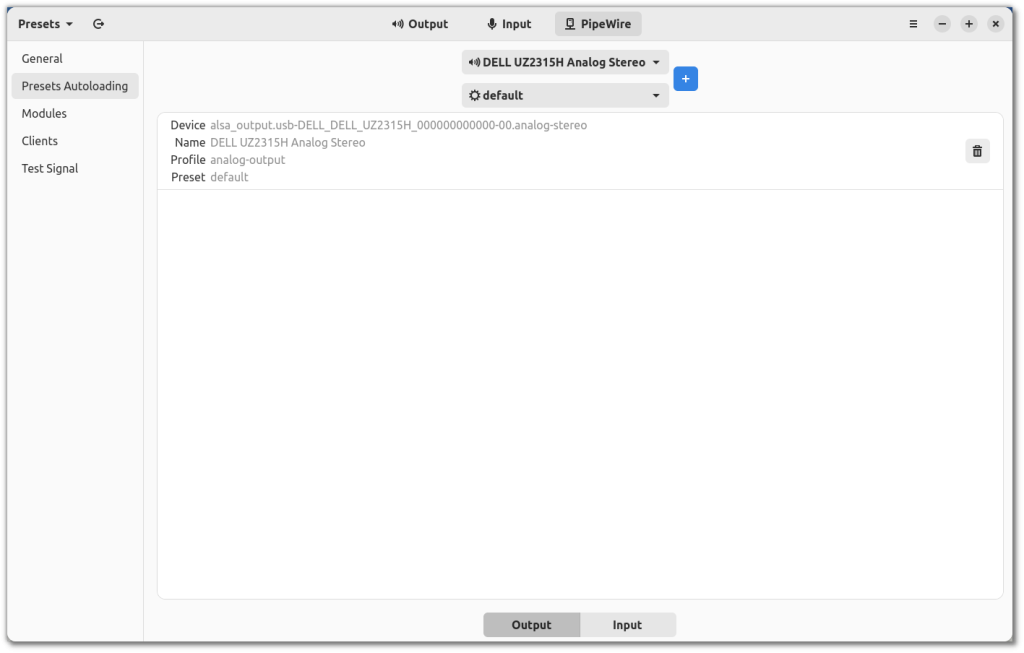
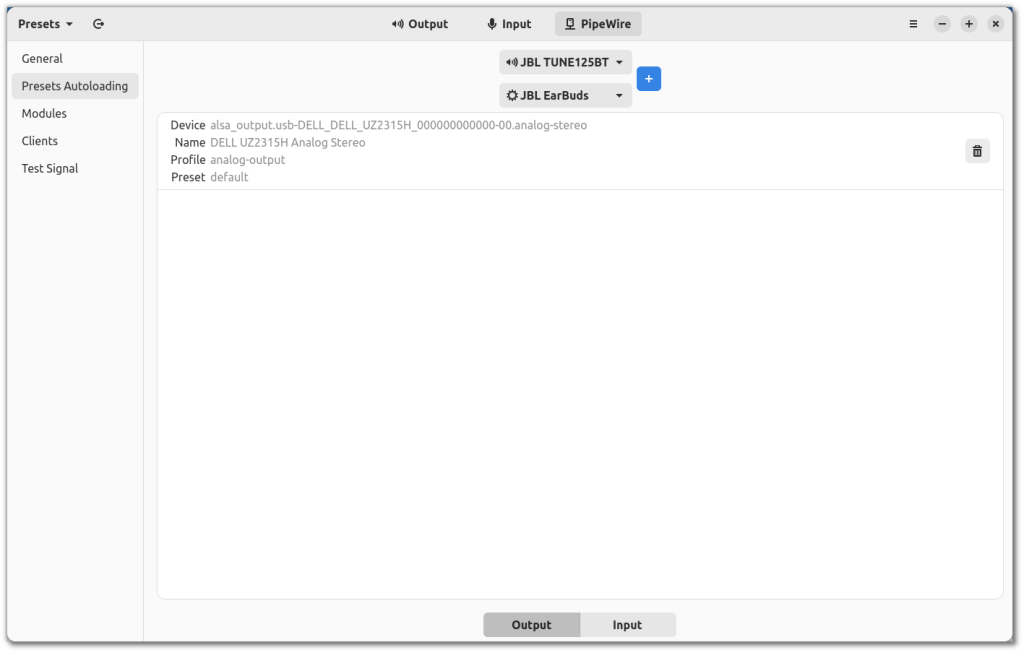
Step 10: Assign audio presets to hardware, navigate to tab PipeWire > Presets Autoloading, select the audio device from the top menu and the audio preset from the bottom menu, click the + sign.
Now you have assigned an audio preset to a piece of hardware. I my case, my Dell Monitor is now attached to the default audio preset. Every time this audio device is loaded or switched to, the default audio preset is loaded.
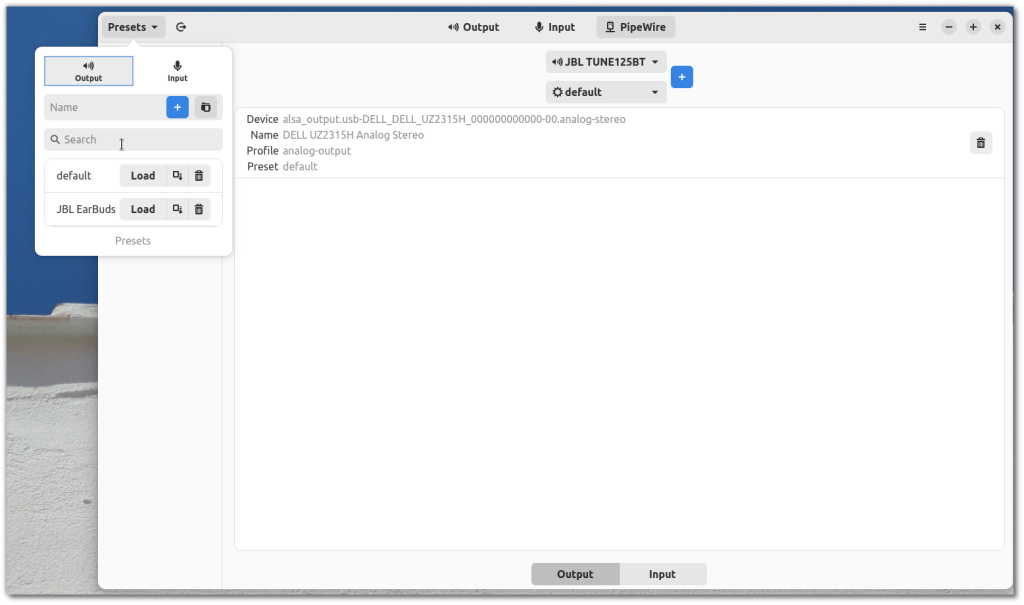
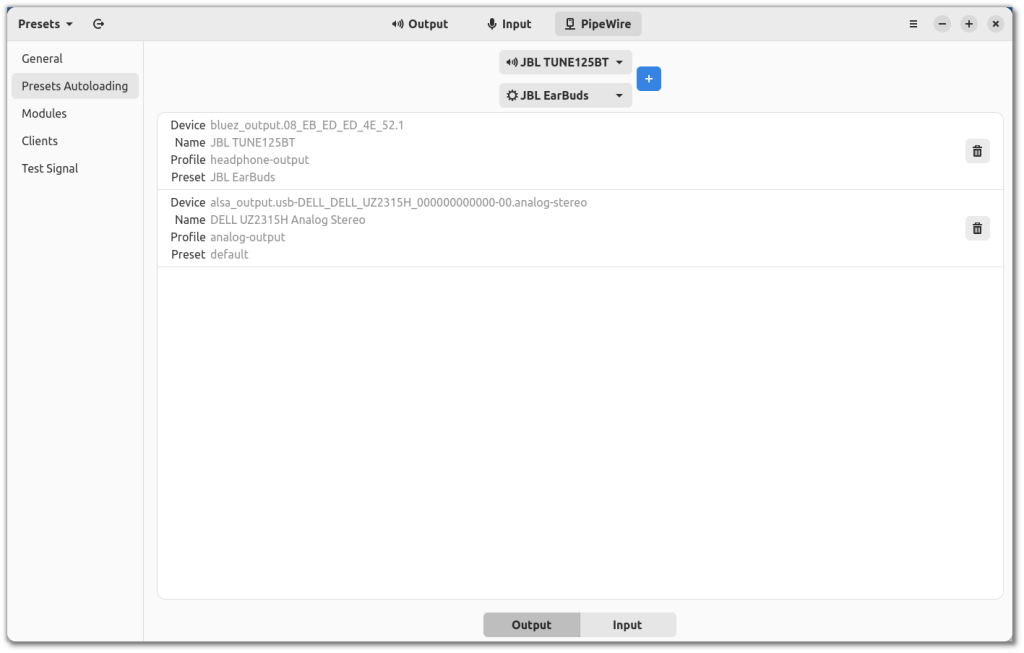
Now, in this system, there is also a pair of Bluetooth earbuds, so we want to create a preset for them as well. First step is to go to Presets and just add a name and click the + sign. This will automatically create a copy of the last preset, you can then just edit to your liking. But here is the clincher, you must make sure you are saving the right preset! If you are editing the JBL Earbuds and accidentally click save the default, you just overwrote the default preset.
Once, you have a preset for the JBL, go back to Presets Autoloading and add the preset to the JBL device. Now every time you turn on your bluetooth device, the system should automatically switch to the device and enable the preset assigned to it.
UPDATE: For a quick start, here is a link to a default preset that you can use, download this Default.json 2 file and copy if to your home folder .config/easyeffects/output/
Then you can simply adjust the settings.
For Distro devs, it would make the system sound much better right from the beginning to have a file in place.
